
How to Add Custom User Styles in Firefox
In this tutorial, I will show you how to add custom styles to Firefox browser so that you can change/enhance how web pages look to suit your needs.
To learn how to add custom user styles in Google Chrome, please check this tutorial.
There may be a number of reasons for web users to want to modify the styles of web pages they are visiting. These reasons may range from visual disabilities to color blindness, from personal viewing preferences to getting rid of annoying web page elements such as flashing banners, popups, unstoppable videos or moving text which make it almost impossible for you to focus on the content you are interested in. In short, being able to adding your custom styles in order to modify how a web page looks is a must-have for any browser that respects user accessibility and personal web browsing preferences for all types of users.
In the past, most web browsers allowed their users to apply their custom user-generated styles to enhance their web browsing experience; however, for reasons unknown some web browsers such as Google Chrome removed that ability and kind of "forced" their users to use extensions created by third party users. Luckily, in Mozilla Firefox, you can still apply your own custom user styles without having to download and install any addons. In the rest of this tutorial, I will demonstrate how you can easily apply your own styles to any web page that you want.
Find Firefox Profile Folder
1. Open your Firefox browser.
2. Type about:support in the address bar and press Enter. You will see the Troubleshooting Information page where you can see some detailed information about your Firefox installation.
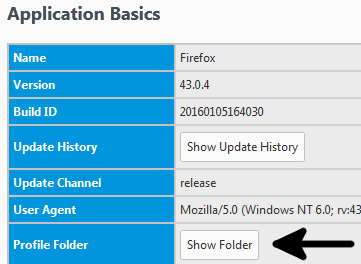
3. In the first section, Application Basics, you will see the Profile Folder entry. Click Show Folder button. This will open your profile folder for this installation of Firefox browser.
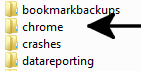
Create "chrome" Folder in Your Firefox Profile Folder
If you see a chrome folder in your profile folder, skip to the step 5.
4. Create a new folder in your profile folder and name it chrome.
Create "userContent.css" Filfe in chrome Folder
If you see a userContent.css file in the chrome folder, skip to the step 6.
5. Create a new file and name it userContent.css. Note that this is a CSS style file and its extension is .css. So, make sure to save it exactly as the name given here.
This style file is where we will be inserting our custom styles.
Create Your Custom Styles
6. Open the newly created userContent.css style file with your text editor (e.g. Notepad) and start applying CSS styles to control how the web pages look to suit your needs and preferences.
Here is a basic example to show how you can use custom styles in Firefox to modify the style of web pages:
I use Craigslist (an online classifieds site) from time to time to apply for freelance projects. With a recent layout change, the margin between listings on the search pages became a little much resulting in less listings being displayed on the screen. So, I added the following custom style to reduce the margin between the listing:
.search .row { margin: 0 0 0 1em !important }
Note that this style will affect all websites that you visit where they have elements with the same class names. You can also apply the styles to specific domains as you wish.
Apply Custom Styles in Firefox to Specific Domains
Following the example above, if I wanted to limit the custom style to only Craigslist site, I would have the following code in my userContent.css file:
@-moz-document domain(craigslist.org) {
.search .row { margin: 0 0 0 1em !important }
}
Please also check the CSS tutorials if you need further help with CSS styling.