How To Limit the Maximum File Transfer Size in FTP
The File Transfer Protocol (FTP) doesn't have any hard limits on the maximum file size and the maximum number of files for transfers. However, you can still apply a limit to control the file transfer to your server, which I will demonstrate in this tutorial.
How FTP Maximum File Size Limit Works
In a previous post, I talked in detail about the maximum file transfer size in FTP mentioning that even though there is no technical size limits for FTP file transfers (download/upload) from and/or to a web server, there are things that may directly or indirectly apply a limit.
As also explained in that post, FTP Quota is among those limiting factors that a server admin can use to control and limit the access to the website/server for FTP users, which is logged by the ftpquota file. The main purpose of applying an FTP quota is to limit the size of the total file transfers an FTP account can make. For example, an FTP quota of 1000MB means that the user can upload/download files via FTP until the total amount of uploads and downloads reach 1000MB in size.
Another way that you can use the FTP quota mechanism is to enforce a maximum value for a single file transfer. Let's say that you applied an FTP quota of 75MB, the user will 1) not be able to transfer multiple files in multiple sessions above 75MB, and 2) not be able to transfer a single file larger than 75MB. Remember that FTP accounts may have access to whole sites or to specific directories, which is an important point to keep in mind when limiting FTP access.
How to Set a Limit for Maximum File Size in FTP Transfers
I demonstrated how to set FTP quota briefly in another post; now, I will show an example about how to use the FTP quota for setting a limit to the maximum file size that a user can transfer via FTP.
STEP 1: Go to your hosting control panel using the link and login credentials your hosting company provided you with.
Depending on the hosting company you are working with and the type of hosting you have (shared, VPS, dedicated, etc.), you may or may not have a hosting control panel and the one you have may be different than the one I will be using in this tutorial, which is cPanel.
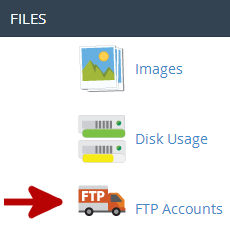
STEP 2: Find the FTP Accounts button in the Files section and click on it.

This will open the FTP Accounts page where you can add new accounts and edit old ones. If you want to change the FTP quota value of an existing FTP account, you can do so by finding the account in question and using the Change Quota option.
We will continue with creating a new FTP account with a quota.
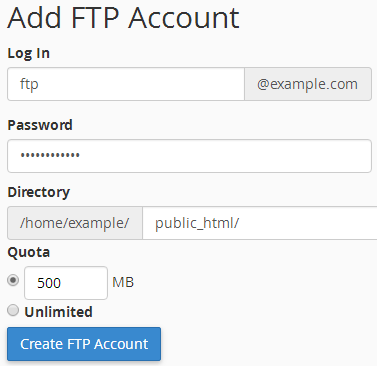
STEP 3: Create a new FTP account by filling the input fields with a login username, password, the directory of access. The Directory is the folder the FTP account will have access. If you want to provide access to the whole site, keep public_html as it is.

At the bottom of the form, you will see a field for the Quota which has two options. One of the options is Unlimited which tells the FTP server not to apply any limits on this account, hence the user can upload and download files via FTP with no limits. The other option is a quota value in megabytes (MB), which you can specify as you wish.
In our example, I set the FTP quota to 500MB, which means that the user will not be able to upload/download a total of 500MB of files during FTP sessions as well as a single file that is larger than 500MB. You can adjust this value depending on your needs any time using the Change Quota option at the FTP Accounts section of the page.
STEP 4: Finally, click Create FTP Account button to create the account with the specified username, password, directory and quota.
The account you created will now have a limit (quota) on the total amount of file transfer size and also a single maximum file transfer size, since the total cannot exceed the value you entered.
