How to Create an API Key in Google Developers Console
If you have never created an API key for any of the Google services related development project before, it may seem a little complicated at first. This tutorial will take you through the steps of getting an API key from the Google Developers Console, to use in your project.
Google provides web and app developers with an extensive set of products and services that they can use in their own development projects such as websites, web applications, mobile apps and other software. Google makes its services available via APIs (Application Programming Interface), so that you can create connections to the Google service you need to use in your project via the API and display the information and data within your project.
Some of the popular Google services that offer an API can be counted as Google Maps API for displaying maps on your website or app, Google Apps API for working with documents and files on Gmail, Drive, Sheets or Calendar, YouTube API for video data analytics and reporting, Google Play API for game services, places and messaging, Google Cloud API for cloud storage, DNS and SQL, and some others.
TIP: You can find a detailed list of all available Google APIs on the Google APIs Explorer.
If the project you are developing, be it a website, a web software or a mobile application for Android or iOS, requires the use of any of the Google services, such as creating custom Google maps, embedding YouTube videos with enhanced features or implementing any of the apps or cloud storage functionality, then you will need to use a unique API key that will allow Google to recognize your project and let it access its services.
Most of the APIs offered by Google are freely available for use in your projects, usually up to a certain usage limit (e.g. a limited number of API requests per day). Whether you use the APIs as a free user or pay for premium plans, you will need to create an account at Google Developers Console and create your API key so that you can use the API in your project.
How to Get API Keys from Google API Console
To create an API key in Google Developer Console (also known as Google API Console) for any of the services, you will first need to create an account, if you don't already have one. If you have a regular Google account, that you use with any other Google service (Google Play, Gmail, YouTube, Blogger, Maps, etc.), it will also work.
STEP 1: Visit the link below to log in to your Google Developers Console account:
https://console.developers.google.com/
Once logged in, you can also view the available popular APIs or search over 100 APIs on the API Library page.
STEP 2: On your API Manager Dashboard, click Project button at the top, on the right of the Google APIs logo, and then click Create Project on the dropdown menu.
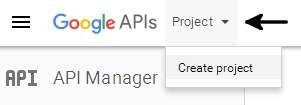
(© 2020 Google LLC, used with permission. Google and the Google logo are registered trademarks of Google LLC.)
This will open a small popup window which will allow you to give a name and ID to your project as well as select its region.
STEP 3: On the New Project window, enter a Project name for your project to help you easily remember what it was about.
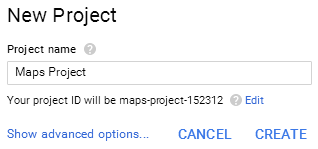
The Project Name can be anything you want and it will be visible only to you; it is used just so you can easily recognize your project, assuming you may have many more in the future.
Your project will be assigned an ID and region automatically but you can also change them by clicking the Edit link next to the project ID and clicking Show Advanced Options... at the bottom.
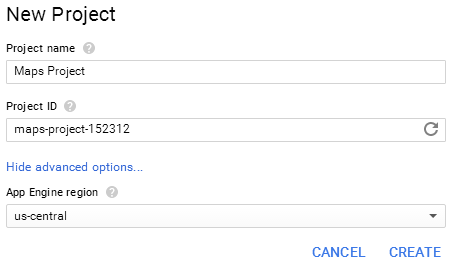
STEP 4: Enter a Project ID for your project, and select an App Engine region that will best fit for your target audience region. Note that you can't give any ID to your project as you want since it has to be unique across all Google API projects created by all users. So, you may as well keep the one that was allocated by the system.
STEP 5: Once you are done with the project details, click the Create button to create your project.
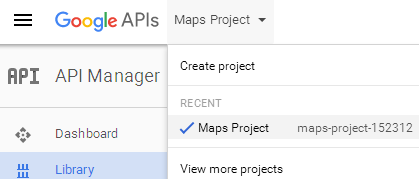
It will take a few seconds to create your project. Once it is created, it will now be selected by default; you can also select any of your projects from the dropdown menu at the top (where you first clicked the Create Project button).
What is left is to select which API you will be use, enable it and create credentials for it.
STEP 6: Making sure your newly created project is the actively selected one, go to the API Library (you can also click the Library link on the left sidebar in API Manager), and select the API you want to use.
For demonstration purposes, we selected the Google Maps JavaScript API. On the API page, you will see a brief documentation about the API and how it is used.
STEP 7: Click the Enable key on the API page. This will enable the use of Google Maps JavaScript API in your project.
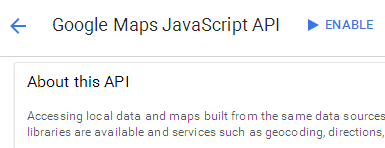
Once the API is enabled, you will be sent to the API statistics page.

STEP 8: Click Create Credentials button which will open the Credentials wizard.
What credentials you will need (API key, client ID, service account) will depend on which API you will use.
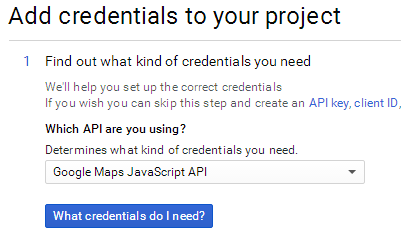
STEP 9: Make sure the correct API is selected in the dropdown menu and click What credentials do I need? button to create your API key.
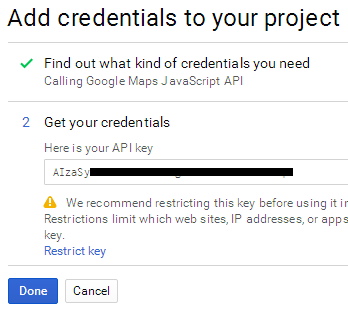
Your API key will be created and it will now be ready to use in your project. Simply select the API key in step 2 where it says "Get your credentials" and use it in your project. Once the key is copied, click the Done button.
One important thing to keep in mind is that you wouldn't want anyone else to use your API key on other websites or apps without your consent and consume your resources, especially if you are paying for it. To prevent that, you can click the Restrict key link to restrict the usage of your API key to your own website(s), apps or IP addresses.
Now that you know how to generate API keys in Google Developers Console, you can continue with the implementation of Google APIs in your projects.
