
How to Install MySQL Database Server on Windows
In this tutorial, we will demonstrate how to install MySQL on a Windows PC in easy to follow steps.
Years ago, I leared using PHP and MySQL to create my own custom coded websites including this one. As a web developer, I enjoyed working with PHP and MYSQL a lot. While improving this website and developing others, I will continue learning PHP programming and MySQL database to a more advanced level. I will document everything I learn about them on this site and I hope you will find it useful.
I talked about how to install Apache and PHP on a Windows PC in my other posts and now I will talk about how to install MySQL on your computer so that your local server will have the database functionality as well. Actually, MySQL is not the only option for you to work with databases, there are a lot of open source MySQL alternatives on the web and you can choose whichever you want. However, MySQL is very popular and has a lot of resources and a huge community where you can get help when you need. Also, most of the hosting providers support MySQL, that's why I decided to go with MySQL and install it on my computer.
Now, if you are ready, we can start with the installation steps.
Which Version of MySQL to Download?
The first thing to do is to know which MySQL version you need in your project. When you visit the downloads page of MySQL, you will notice a number of versions available to download: MySQL Community Server (free), MySQL Enterprise Edition (commercial), MySQL Cluster, MySQL Cluster CGE and MySQL Workbench. If you specifically know which version you need then go for it. If you don't have an idea, you can download MySQL Community Server, the free version which is distributed with a GNU license.
Download MySQL
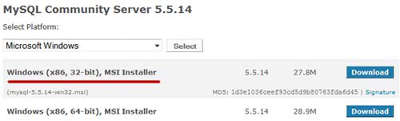
Go to http://www.mysql.com/downloads/mysql/ and choose the operating system (Microsoft Windows). Depending on your Windows version, choose the appropriate package and download. I have a 32bit Windows installation, that's why I chose Windows (x86, 32-bit), MSI Installer.
Note that MySQL version might be different at the time you are reading this post.
Install MySQL
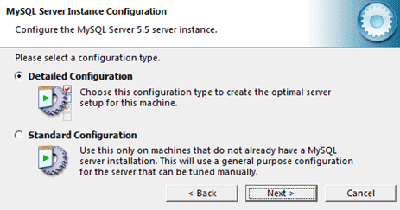
Once the download is complete, run the file. You will see a Welcome window, click next and accept the license terms. The installation wizard will automatically install MySQL and when it is done, you will see the MySQL Server Instance Configuration Wizard window. Click next and select Detailed Configuration.
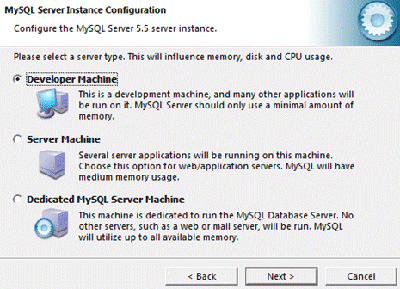
On the next window, select Developer Machine since we are installing it on our computer where we will work as a developer and not a publisher at the moment. You could choose Server Machine if you were installing MySQL on a server.
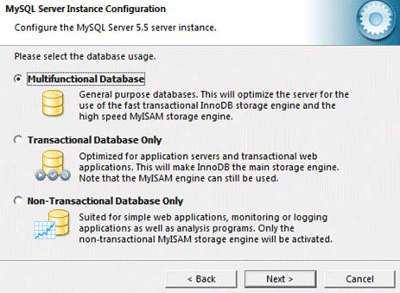
On the next window, you will choose the database usage. If you will be using general purpose databases, select Multifunctional Database.
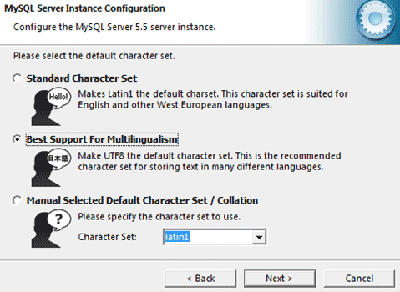
On the next window, you can leave the drive for the InnoDB datafile as default and click next. If you want to specify another directory, you can also do that. On the next window, select the option that suits your purpose for the number of concurrent connections to the server. If you are the only person who will connect to the server, then you can select the manual settings and set it to a number of your choice. On the next window, you will set the networking options and server SQL mode. If you want to allow TCP/IP connections, select Enable TCP/IP Networking. Also select Enable Strict Mode. On the next window, it will ask you to select the default character set. I personally use UTF8 in all my websites that's why I selected Best Support for Multilingualism option.
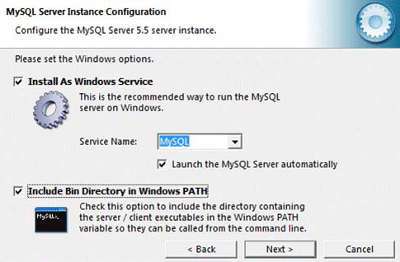
On the next window, you will set the Windows options. Select Install As Windows Service. If you want MySQL server to run automatically when you start Windows, select that option. Also, if you want to use the command line to manage your databases, select Include Bin Directory in Windows PATH option.
Finally, the installation wizard will ask you to specify the security options by adding a password. On the next window, click on the Execute button to finalize the configuration. And it is done. You should see your MySQL server up and running in the Windows Task Manager/Processes tab as mysqld.exe.