How to Create a MySQL Database in cPanel
You can create a new MySQL database using the database creation wizard of cPanel in less than a minute. In this tutorial, I will demonstrate how to create a MySQL database for a website or web application in cPanel.
If your website is hosted on a server with cPanel hosting control panel and MySQL database server, it will be quite easy for you to create and manage your databases where you can store the content and other related data of your website.
TIP: If you are new to cPanel, it would be better to start with cPanel Documentation to learn the basics about its interface and features.
Before we start, I should mention that cPanel has a number of interface theme options based on its version and your hosting company but regardless of how your cPanel layout is, the database creation steps will be more or less the same. I will be using the default "root" style of cPanle in this tutorial, which is also the one that I prefer to use while managing my hosting account due to its simplicty.
Now, let's start with the first step of creating the database.
STEP 1: Create a MySQL Database in cPanel
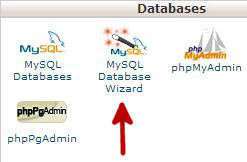
Once you log in to your hosting account, where you can see the cPanel dashboard, go to the Databases section and click on MySQL Database Wizard.

This will open the MySQL Database Wizard page which will guide you through the database creation process. You should see Step 1: Create A Database section and a text input field next to New Database: followed by your hosting account username and an underscore "_". Enter a database name to the text field and click the Next button.

If all goes well, you should see a success message like the following:
The system successfully added the database “username_databasename”.
Of course, you should see your own database name. Once your database is created, the wizard will send you to the next step of creating the database user.
TIP: While naming your database, make sure that there is no other database in your account with the exact same name because database names must be unique on a single database server.
STEP 2: Create a Database User
Once the database is created, we can now create a user and assign to this database. Do not confuse this user as a website visitor or a person who logs into your website. The database user is what your website scripts will be using in order to successfully communicate with the database to store and retrieve information.
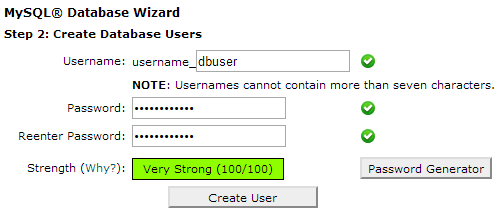
On the second page of the database wizard, you should see the Step 2: Create Database Users section where you will enter username and password details for the database user. The username should have up to 7 characters (after your hosting account username + underscore) and you should select a strong password. You can also use the Password Generator tool that is provided next to the user details form, if you are having difficulty coming up with a strong password.

Remember to take note of your database name and database user's username and password as you will most probably need them in your database connection script. Once you have the username and password set, click Create User button.
STEP 3: Add the User to the Database
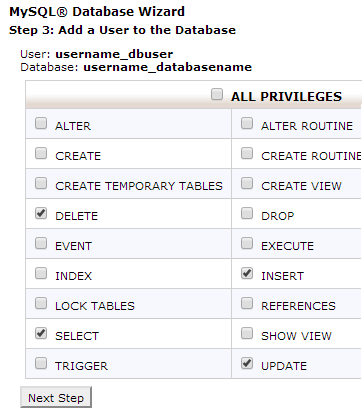
The last step is to add the user that you just created to your new database. On the 3rd page of the database wizard, you should see the Step 3: Add a User to the Database section, which will display the user and database names. Make sure they are correct before proceeding.
One the Privileges table, assign privileges to your database user to give permission for what type of actions it (your scripts) can perform on your database depending on your needs. If you are unsure about which privileges to choose, you can read this entry on the official MySQL documentation to figure out which ones you will need on your website.

Once you select the appropriate privileges, click Next Step button which will finalize your database and user creation process.
You can now use the database details (database name, database user username, database user password) in your scripts to make connections to your database and process your data.
